


Changing the DNS server on Android devices

DNS (Domain Name System) is one of the vital elements of the Internet in the form we know today. In fact, there was no such use of the Internet without DNS because, given the growing importance of domain names, the servers that we use to search for domains become an integral part of our Internet browsing experience. We will explain the procedure of configuring Android to use your preferred domain name server.
Irancell.ir is a domain name and when you visit the site that this name refers to, your computer or smartphone connects to a DNS server to translate this name to a numeric IP address. You can consider this server as something like a phone book, which takes easy-to-remember names and looks up for a corresponding sequence of numbers through which you can connect with someone.
One interesting consideration is that not all DNS servers are identical. In a nutshell, some of these servers are faster than others, while privacy and security considerations should also be considered for using them since whoever is running DNS server knows a lot of things about the sites you have visited.
There are some popular DNS servers like Google Public DNS, OpenDNS, and Cloudflare so you can choose one. Also, your Internet Service Provider or Internet Service Provider may recommend you to use a particular DNS to improve the speed.
Configuring your device manually to use a specific DNS server should be simple. You just have to configure the address of the DNS server you want (for example, 1.1.1.1) in the device’s settings, and tell it to use the new server instead of the default DNS server. However, the performing this process can be complicated for some users, so we will explain it briefly.
Wi-Fi settings
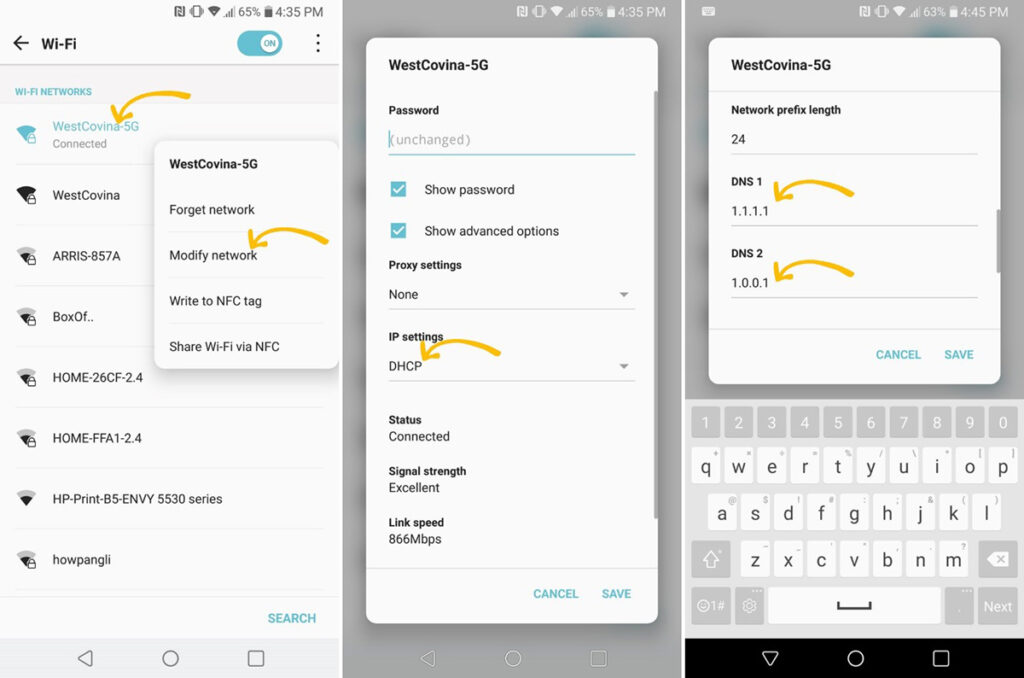
Currently, Android lets you specify a DNS server through Wi-Fi settings. To make changes, once you have connected to a wireless router or access point, keep your finger on its name until the corresponding options appear. In this list, tap the Modify Network. Now select the Advanced options to see the IP Settings section.
Typically, the IP Settings option in your tool is set to DHCP. This setting indicates that the device is set to DHCP. It means that the device doesn’t have any particular preference for network configuration, and it receives all the relevant settings from your wireless router every time that connects to it. However, if you set this option to Static mode, you can manually enter all the settings you want, including the DNS server. You will have two options for specifying DNS primary and backup servers that in our example are set to 1.1.1.1 and 1.0.0.1. If you prefer to use Google DNS servers, you can set it to 8.8.8.8 and 8.8.4.4.
Note that changing these settings will also bring up some other issues. For example, you must manually set the IP address of your device and the Gateway of wireless router you are using. Even if you don’t have any problem doing that, these are settings that you would like to configure just when the router is directly under your control (for example, on a home network). So you need to know how to set your preferred DNS server regardless of Wi-Fi network you’re connecting. Even if you configure Android to use your preferred DNS server for all Wi-Fi networks you use, there’s still no option to change the server used when you connect to the Internet through your cellular plan.
Private DNS
As you can see, we need a more comprehensive solution. The good news is that Google has realized this and will provide a simple and practical way to change the default DNS settings on Android. However, the bad news is that the feature will only be available as part of the Private DNS mode of Android P. This not only increases the security of communication with domain name servers but also allows you to specify the server you want, without having to configure all Wi-Fi networks you use, manually.
Although Private DNS promises the same solution we are looking for, Android P has not yet been officially released, and even after that, it’s not clear when your device receives the new update (if it ever does). So, is there anything we can do to get similar results that be available now and works on all of our Android devices?
Local VPN
Fortunately, there’s such an option, but to use it, we need to go outside of the world of Android’s native settings and examine some apps provided by third-party developers. In the past, using an application to change the global DNS settings of Android devices often required rooting your phone, and that’s something most users don’t like to do. But there are other apps that rely on Android’s support for VPN (Virtual Private Network) to find a solution for this, without having to have root access to your device.
When you use a VPN, your data traffic is routed to a specific server before reaching the Internet, and DNS requests are no exception. Now if you run a local VPN server right on your phone, you’ll have everything to use your desired DNS server.
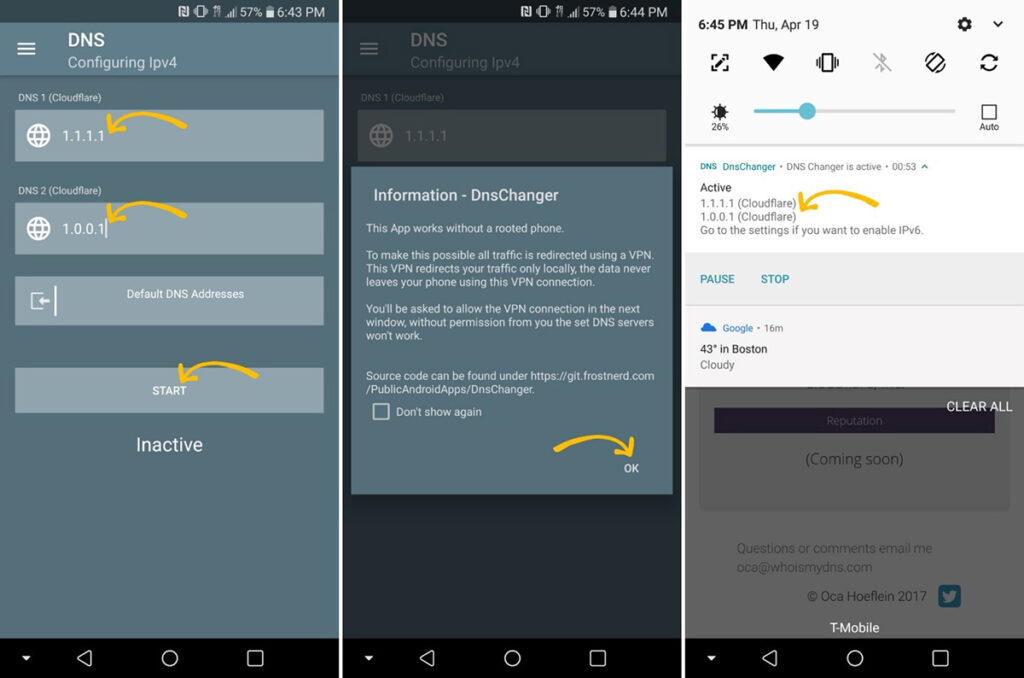
We tested Frostnerd’s DNS Changer app for this, which does exactly the same thing, and its configuration is incredibly simple. You just have to enter the address of the primary and backup DNS servers and approve the creation of the app’s VPN. In less than 30 seconds, everything is ready, and your phone can use the domain name server you specified on Wi-Fi or mobile connections alike.